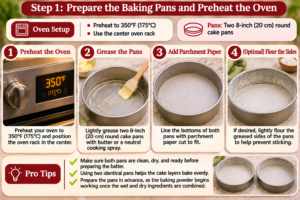
Step 1: Prepare the Baking Pans and Preheat the Oven. Preheat your oven to 350°F (175°C) and position the oven rack in the center to encourage even baking. Lightly grease two 8-inch (20 cm) round cake pans with butter or a neutral cooking spray, then line the bottoms with parchment paper cut to fit each pan. If desired, lightly flour the greased sides of the pans to help prevent sticking. Make sure both pans are clean, dry, and ready before preparing the batter, as the baking powder begins working once the wet and dry ingredients are combined. Using two identical pans helps the cake layers bake evenly and makes assembling the finished matcha gateau easier.
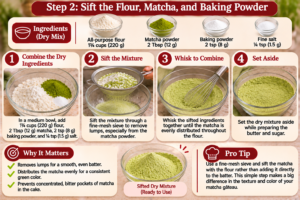
Step 2: Sift the Flour, Matcha, and Baking Powder. In a medium mixing bowl, combine 1¾ cups (220 g) of all-purpose flour, 2 tablespoons (12 g) of culinary-grade matcha powder, 2 teaspoons (8 g) of baking powder, and ¼ teaspoon (1.5 g) of fine salt. Sift the mixture through a fine-mesh sieve to remove lumps, particularly from the matcha powder, which can clump easily. Whisk the sifted ingredients together until the green tea powder is distributed evenly throughout the flour. This step is important for achieving a consistent natural green color and preventing concentrated pockets of bitter matcha in the finished cake. Set the dry mixture aside while preparing the butter and sugar.
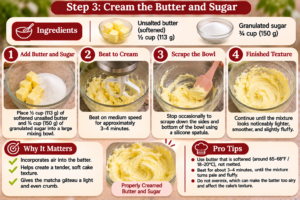
Step 3: Cream the Butter and Sugar. Place ½ cup (113 g) of softened unsalted butter and ¾ cup (150 g) of granulated sugar into a large mixing bowl or the bowl of a stand mixer fitted with a paddle attachment. Beat on medium speed for approximately 3–4 minutes, until the mixture looks noticeably lighter, smoother, and slightly fluffy. Stop occasionally to scrape down the sides and bottom of the bowl using a silicone spatula. Proper creaming helps incorporate air into the batter, supporting a tender cake texture. The butter should be softened but not melted, since excessively warm butter may reduce its ability to hold air during mixing. Continue only until the mixture appears evenly creamed.
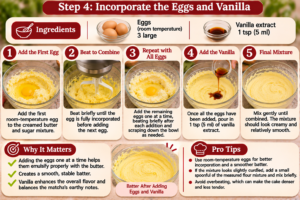
Step 4: Incorporate the Eggs and Vanilla. Add the three room-temperature eggs to the creamed butter and sugar mixture, one at a time, beating briefly after each addition until incorporated before adding the next. Scrape down the bowl as needed to keep the batter uniform. Once all the eggs have been added, pour in 1 teaspoon (5 ml) of vanilla extract and mix gently until combined. The mixture should look creamy and relatively smooth, although slight curdling can occur if the ingredients are at different temperatures. If the batter begins to appear separated, add a small spoonful of the measured flour mixture and mix briefly. Avoid overbeating at this stage, as excessive mixing can affect the finished cake's texture.
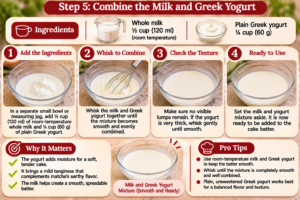
Step 5: Combine the Milk and Greek Yogurt. In a separate small bowl or measuring jug, whisk together ½ cup (120 ml) of room-temperature whole milk and ¼ cup (60 g) of plain Greek yogurt until the mixture becomes smooth and evenly combined. The yogurt contributes additional moisture and a mild tanginess that complements matcha's distinctive earthy flavor, while the milk helps create a cake batter that can be spread evenly into the prepared pans. If the yogurt is very thick, whisk gently until no visible lumps remain. Keeping the dairy ingredients at room temperature also helps prevent the butter in the cake batter from firming up unexpectedly when the ingredients are combined.
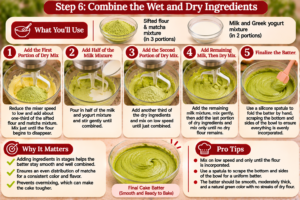
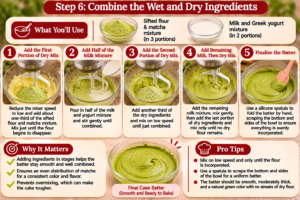
Step 6: Combine the Wet and Dry Ingredients. Reduce the mixer speed to low and add approximately one-third of the sifted flour and matcha mixture to the butter mixture, mixing just until the flour begins to disappear. Pour in half of the milk and yogurt mixture and stir gently, then repeat with another third of the dry ingredients, the remaining milk mixture, and finally the last portion of dry ingredients. Use a silicone spatula to finish folding the batter by hand, scraping along the bottom and sides of the bowl to ensure everything is evenly incorporated. The finished batter should be smooth, moderately thick, and naturally green, with no visible streaks of dry flour. Avoid prolonged mixing once the flour is incorporated because it can develop gluten and create a tougher cake.
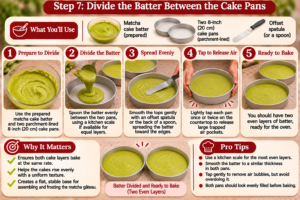
Step 7: Divide the Batter Between the Cake Pans. Spoon the prepared matcha cake batter evenly into the two parchment-lined 8-inch (20 cm) cake pans, using a kitchen scale if available to ensure both layers contain approximately the same amount. Smooth the tops gently with an offset spatula or the back of a spoon, spreading the batter toward the edges and corners of each pan. Lightly tap each pan once or twice against the countertop to release large trapped air pockets, taking care not to deflate the batter excessively. The batter should form a relatively even layer in each pan, helping the cakes rise consistently and creating a neat foundation for the whipped cream frosting.
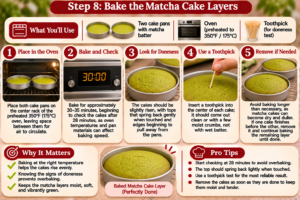
Step 8: Bake the Matcha Cake Layers. Place both cake pans on the center rack of the preheated 350°F (175°C) oven, leaving enough space between them for air to circulate. Bake for approximately 30–35 minutes, beginning to check the cakes after 28 minutes because oven temperatures and pan materials can affect baking speed. The cakes should appear slightly risen, with tops that spring back gently when touched and edges beginning to pull away from the pans. Insert a toothpick into the center of each cake; it should come out clean or with a few moist crumbs rather than wet batter. Avoid baking longer than necessary, as matcha cakes can become dry and develop a duller color when overbaked. If one cake finishes before the other, remove it separately and continue baking the remaining layer until done.
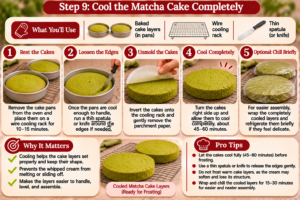
Step 9: Cool the Matcha Cake Completely. Remove the cake pans from the oven and place them on a wire cooling rack for approximately 10–15 minutes. Once the pans are cool enough to handle, carefully run a thin spatula or knife around the edges if necessary, then invert the cakes onto the cooling rack and gently remove the parchment paper. Turn the cakes right side up and allow them to cool completely, approximately 45–60 minutes depending on room temperature. Do not apply whipped cream frosting while the cake layers are warm because the cream may soften, slide, or lose its structure. For easier assembly, wrap the completely cooled layers and refrigerate them briefly if they feel particularly delicate.
Step 10: Prepare the Matcha Whipped Cream Frosting. Place a clean mixing bowl and the beaters of an electric mixer in the refrigerator for approximately 10 minutes before making the frosting. Pour 2 cups (480 ml) of cold heavy whipping cream into the chilled bowl, then add ½ cup (60 g) of sifted powdered sugar, 2 teaspoons (4 g) of sifted matcha powder, and 1 teaspoon (5 ml) of vanilla extract. Begin beating on low speed until the matcha and sugar are incorporated, then gradually increase to medium speed and whip until the cream forms medium-stiff peaks that hold their shape when the beaters are lifted. Stop mixing as soon as the frosting becomes thick, smooth, and spreadable, since overwhipping can make it grainy and eventually cause it to separate. Keep the frosting refrigerated until you're ready to assemble the cake.
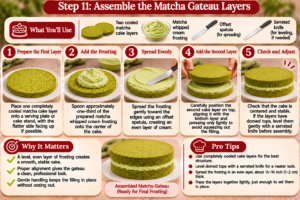
Step 11: Assemble the Matcha Gateau Layers. Place one completely cooled matcha cake layer onto a serving plate or cake stand, positioning it with the flatter side facing upward if possible. Spoon approximately one-third of the prepared matcha whipped cream frosting onto the center of the cake and spread it gently toward the edges using an offset spatula, creating an even layer of cream. Carefully position the second cake layer on top, aligning it with the bottom layer and pressing only lightly to avoid squeezing out the filling. Check that the cake is centered and stable before continuing. If the cake layers have noticeably domed tops, level them gently with a serrated knife before assembly to help create a more even finished gateau.
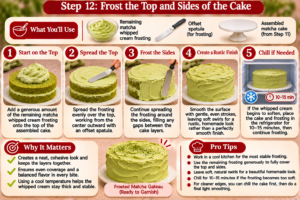
Step 12: Frost the Top and Sides of the Cake. Using the remaining matcha whipped cream frosting, spread a generous layer over the top of the assembled cake, working from the center outward with an offset spatula. Continue spreading the cream around the sides, filling any gaps between the cake layers and smoothing the surface with gentle, even strokes. For a rustic homemade appearance, leave subtle swirls in the frosting rather than trying to achieve perfectly smooth bakery-style sides. If the whipped cream begins to soften while you're working, place the cake and frosting in the refrigerator for approximately 10–15 minutes before continuing. Work in a cool kitchen whenever possible, as whipped cream is less stable than traditional buttercream frosting.
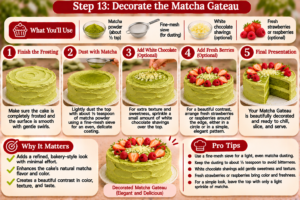
Step 13: Decorate the Matcha Gateau. Once the cake is completely frosted, finish the surface with a light dusting of approximately ½ teaspoon of matcha powder using a fine-mesh sieve. Keep the dusting delicate, since excessive matcha powder can create a noticeably bitter coating. For additional decoration, scatter a small amount of white chocolate shavings over the top or arrange fresh strawberries or raspberries around the edge for a beautiful contrast against the natural green frosting. If you prefer a simple presentation, leave the top lightly swirled and decorated only with a small sprinkle of matcha. The goal is to highlight the cake's natural green tea color without overwhelming its delicate flavor.
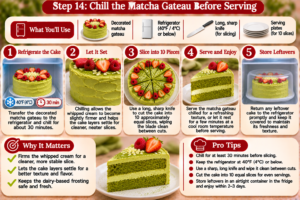
Step 14: Chill the Matcha Gateau Before Serving. Transfer the decorated matcha gateau to the refrigerator and chill for approximately 30 minutes before slicing. This resting period allows the whipped cream to become slightly firmer and helps the cake layers settle, making cleaner slices easier to achieve. Keep the cake refrigerated at 40°F (4°C) or below until ready to serve, particularly because the frosting contains fresh dairy cream. When serving, use a long, sharp knife to cut the cake into 10 approximately equal slices, wiping the blade clean between cuts for neat layers. Enjoy the cake chilled or after a brief rest at a cool room temperature, and return any leftovers to the refrigerator promptly.