


There’s something magical about the smell of homemade stuffing baking in the oven.
Moreover, the butter melts into tender sourdough bread as onions and celery turn fragrant.
The Sourdough Stuffing recipe fills the kitchen with that unmistakable holiday aroma.
As the top becomes golden and lightly crispy, you know something delicious is coming.
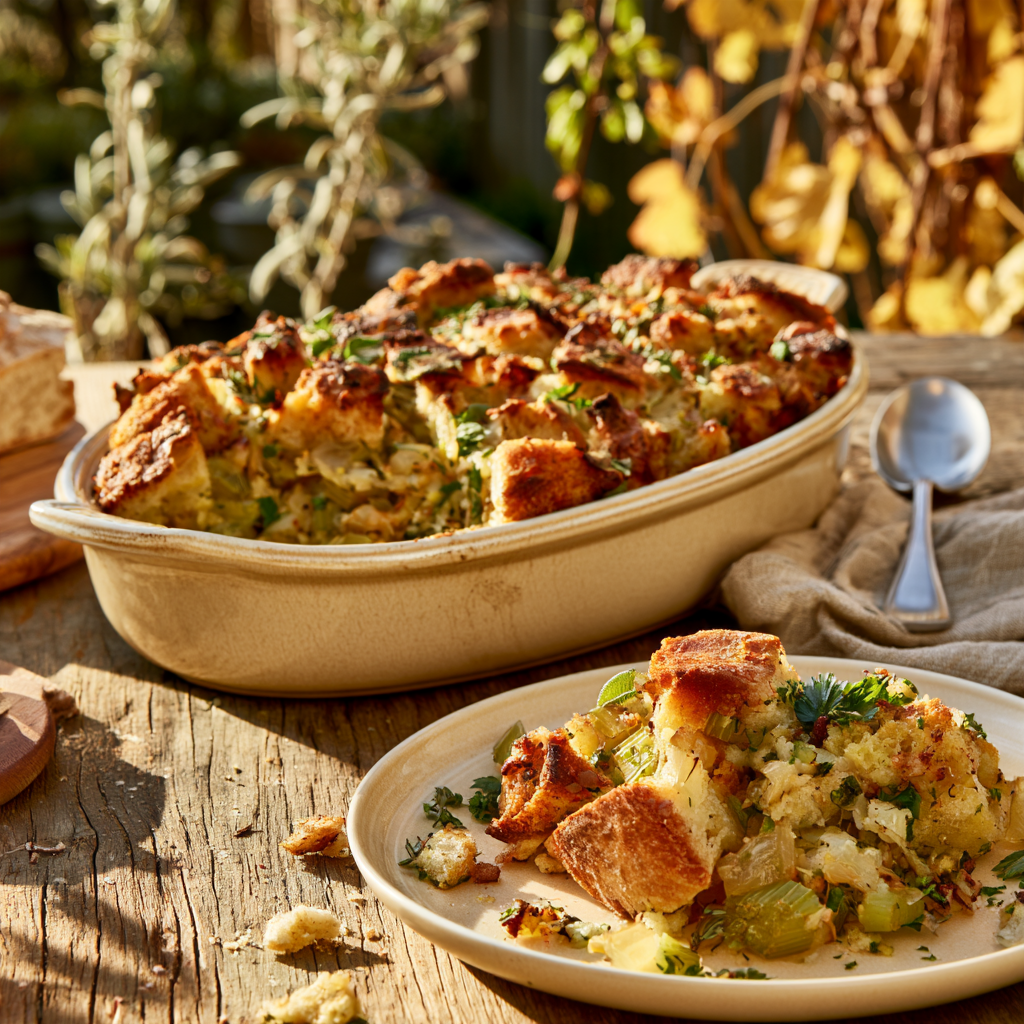
Moreover, when that first spoonful reaches your plate, you get the best of both worlds: a perfectly golden, buttery crust with a soft, moist, herb-filled center.
Indeed, that’s exactly what makes this Sourdough Stuffing Recipe so irresistible!
If you’ve only ever made stuffing with ordinary white bread or a boxed mix, you’re in for a wonderful surprise. Sourdough brings something special to the table: a subtle tangy flavor, a pleasantly chewy texture, and a sturdy crumb that absorbs the buttery herb broth without immediately turning into mush.
The result is homemade stuffing with a little more character, a lot more flavor, and that comforting, rustic texture that makes everyone reach for another helping.
And here’s the best part: you don’t need to make sourdough bread from scratch or spend hours preparing complicated ingredients.
A good loaf of sourdough, a handful of fresh herbs, butter, onion, celery, garlic, and vegetable broth are all you need to create a beautiful, family-style side dish. A couple of eggs help hold everything together while keeping the center tender.

Sourdough Stuffing Recipe
Equipment
- 9 × 13-inch (23 × 33 cm) baking dish
- 2 large rimmed baking sheets
- Large deep skillet
- Extra-large mixing bowl
- Medium mixing bowl or large measuring jug
- Serrated bread knife
- Cutting board
- Wooden spoon or heat-resistant silicone spatula
- Kitchen whisk
- Measuring cups
- Measuring spoons
- Digital kitchen scale (recommended)
- Aluminum foil
- Instant-read food thermometer
- Oven mitts
- Serving Spoon
- Airtight food storage containers
Ingredients
- ½ cup 113 g unsalted butter
- 1 large yellow onion finely diced
- 3 medium celery stalks finely diced
- 3 garlic cloves freshly minced
- 2 tablespoons fresh sage finely chopped
- 1 tablespoon fresh thyme leaves
- 1 teaspoon fresh rosemary finely chopped
- ¼ cup fresh flat-leaf parsley chopped
Instructions
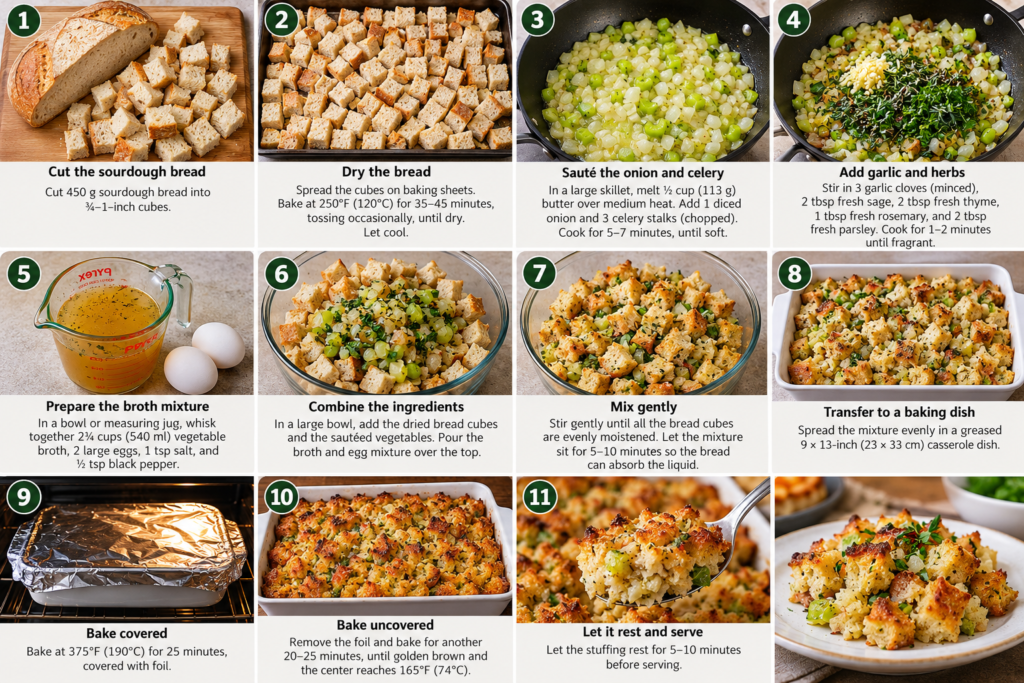
- Step 1: Prepare the Sourdough Bread. Begin your Sourdough Stuffing Recipe by placing approximately 1 pound (450 g) of sourdough bread on a clean cutting board. Using a serrated bread knife, cut the loaf into evenly sized 3/4–1-inch (2–2.5 cm) cubes. Try to keep the pieces relatively uniform so they dry evenly and absorb the vegetable broth at a similar rate. Leave most of the crust intact because it adds rustic texture and helps create crispy golden edges during baking. If the loaf has exceptionally thick or hard crust sections, trim the toughest pieces. Choose a mildly tangy sourdough with a reasonably even crumb rather than an extremely dense or overly sour loaf. The bread weight should be measured before drying.
- Step 2: Preheat the Oven and Dry the Bread Cubes. Preheat your oven to 250°F (120°C). Spread the sourdough cubes across one or two large baking sheets in a relatively even layer. Avoid piling the bread too high because overlapping pieces may dry unevenly. Place the baking sheets in the oven and dry for approximately 35–45 minutes, tossing the bread once or twice during the process. The goal is to remove moisture rather than deeply toast the bread. The cubes should feel firm and dry, with very little softness remaining inside. Remove from the oven and allow to cool briefly. Properly dried bread is essential because it can absorb the buttery broth mixture while retaining distinct pieces instead of immediately becoming mushy.
- Step 3: Increase the Oven Temperature and Prepare the Baking Dish. After removing the dried sourdough cubes, increase the oven temperature to 375°F (190°C) and allow it to preheat fully. Position an oven rack near the center for even baking. Lightly grease a 9 × 13-inch (23 × 33 cm) casserole dish with a little additional butter or suitable cooking spray. Set the baking dish aside while preparing the vegetables and seasonings. The casserole will be baked separately rather than inside poultry, allowing you to control the moisture level and develop a crispy golden surface. Make sure your baking dish is large enough to hold the bread loosely without compressing it into a dense layer.
- Step 4: Melt the Butter and Sauté the Onion and Celery. Place a large, deep skillet over medium heat. Add 1/2 cup (113 g) unsalted butter and allow it to melt gently. Stir in one finely diced large yellow onion and three finely diced medium celery stalks. Cook for approximately 5–7 minutes, stirring occasionally, until the onion becomes soft and translucent and the celery begins to soften. Avoid deeply browning the vegetables. Their purpose is to build a mellow savory flavor that complements the tangy sourdough bread. The melted butter will become infused with the vegetables, creating the rich foundation of traditional holiday stuffing. If the butter begins browning too quickly, reduce the heat slightly.
- Step 5: Add the Garlic and Fresh Herbs. Once the onion and celery are tender, add three minced garlic cloves, 2 tablespoons finely chopped fresh sage, 1 tablespoon fresh thyme leaves, 1 teaspoon finely chopped fresh rosemary, and 1/4 cup chopped fresh flat-leaf parsley. Stir everything into the warm butter and vegetables. Cook for approximately 1–2 minutes, just until the garlic and herbs become fragrant. Avoid burning the garlic or scorching the delicate herbs. Sage provides the familiar holiday stuffing aroma, thyme adds gentle earthy flavor, rosemary contributes a subtle woodsy note, and parsley brings freshness. Remove the skillet from the heat once the mixture smells fragrant and the herbs are evenly distributed.
- Step 6: Prepare the Seasoned Vegetable Broth. Pour 2 1/4 cups (540 ml) low-sodium vegetable broth into a medium mixing bowl or large measuring jug. Add 1/2 teaspoon freshly ground black pepper. If needed, add up to 1/2 teaspoon fine salt, adjusting according to the sodium content of the bread and broth. Taste and adjust the broth before adding the raw eggs, since the final egg mixture should not be tasted uncooked. Crack two large eggs into the seasoned broth and whisk until the yolks and whites are thoroughly combined. The eggs will help bind the bread cubes during baking, while the broth provides moisture and carries the savory flavors throughout the stuffing. Set the mixture aside until ready to combine.
- Step 7: Combine the Dried Sourdough and Buttery Vegetables. Transfer the dried sourdough cubes into a very large mixing bowl. Add the warm onion, celery, garlic, butter, and fresh herb mixture. Using a large spoon or heat-resistant spatula, gently fold the ingredients together until the bread cubes are lightly coated in the fragrant butter and the vegetables are distributed throughout. Avoid vigorous stirring or squeezing the bread because this can crush the cubes and create a dense, pasty texture. The mixture should look rustic, with distinct pieces of golden sourdough, softened vegetables, and fresh green herbs. Scrape any remaining butter and herbs from the skillet into the bowl so none of the flavor is wasted.
- Step 8: Gradually Add the Broth and Egg Mixture. Slowly pour the seasoned vegetable broth and egg mixture over the sourdough cubes, distributing it across different areas of the bowl. Add it in several portions while gently folding the bread to encourage even absorption. Because sourdough loaves vary in density and dryness, monitor the moisture level rather than forcing all the liquid into the mixture if the cubes are already thoroughly saturated. Aim for evenly moistened bread that retains its shape. There should not be a large puddle of liquid at the bottom of the bowl. If the mixture seems dry after absorbing the liquid, an extra tablespoon or two of vegetable broth may be added as needed.
- Step 9: Let the Stuffing Mixture Rest and Absorb Moisture. Allow the moistened sourdough mixture to stand for approximately 5–10 minutes. This resting period gives the dried bread cubes time to absorb the broth and soften evenly. After resting, gently fold the mixture once more and check its consistency. The bread should feel moist and tender when lightly pressed, but the cubes should remain recognizable rather than dissolving into paste. Some crust pieces may remain slightly firmer, which is normal and contributes to the stuffing’s rustic character. If the mixture looks unusually dry, add a little more broth. If it is too wet, gently fold in a small amount of additional dried bread cubes if available. Avoid excessive mixing.
- Step 10: Transfer the Stuffing to the Prepared Baking Dish. Spoon the prepared sourdough stuffing mixture into the lightly greased 9 × 13-inch (23 × 33 cm) casserole dish. Spread it evenly with a spoon or spatula without packing the bread down tightly. Keeping the cubes somewhat loose encourages a more appealing texture, with tender bread underneath and crispy golden pieces on top. Arrange a few bread cubes near the surface so they can brown during the final baking stage. The dish should contain visible pieces of sourdough, onion, celery, and herbs. Do not add a large amount of extra broth at this stage unless the mixture is clearly too dry. Once assembled, proceed with baking rather than leaving the raw egg-containing mixture at room temperature.
- Step 11: Cover and Bake for the First 25 Minutes. Cover the casserole dish securely with aluminum foil and place it in the fully preheated 375°F (190°C) oven. Bake for approximately 25 minutes. The foil helps retain moisture while the center heats through and the egg-and-broth mixture begins setting. During this stage, the bread becomes tender and the buttery herb flavors blend together. Avoid repeatedly opening the oven because losing heat and steam can affect the cooking process. The stuffing will not necessarily look deeply golden at the end of this covered stage, and that is completely normal. The surface will brown during the final uncovered baking period.
- Step 12: Uncover and Bake Until Golden and Fully Cooked. After the initial 25 minutes, carefully remove the aluminum foil. Return the baking dish to the oven and continue baking for approximately 20–25 additional minutes, until the surface is golden brown and the exposed sourdough cubes have lightly crispy edges. The total casserole baking time will generally be around 45–50 minutes, although the exact duration depends on the moisture level, baking dish, and oven accuracy. Insert an instant-read food thermometer into the center of the casserole and confirm that it reaches 165°F (74°C). If the top browns too quickly before the center reaches that temperature, loosely cover it with foil and continue baking until fully cooked.
- Step 13: Rest, Garnish, and Serve. Once the sourdough stuffing has a golden surface and its center has reached 165°F (74°C), carefully remove it from the oven. Place the baking dish on a heat-safe surface or wire rack and allow the stuffing to rest for approximately 5–10 minutes. This brief resting period helps the casserole settle and makes it easier to serve without crushing the bread pieces. Sprinkle a little freshly chopped parsley over the top if desired. Use a large serving spoon to scoop through the crispy upper layer and into the soft, moist center. Divide into approximately eight side-dish portions and serve warm with roasted vegetables, mashed potatoes, gravy, or your preferred holiday main course.
- Step 14: Store and Reheat Sourdough Stuffing Safely. Transfer leftover cooked sourdough stuffing into shallow, airtight containers and refrigerate within two hours of cooking. Store at 40°F (4°C) or below and enjoy within approximately 3–4 days. For longer storage, freeze cooled, fully cooked stuffing in freezer-safe containers or portions for approximately 2–3 months for best quality. Thaw frozen portions in the refrigerator. To reheat, place the stuffing in an oven-safe dish, add a small splash of vegetable broth if it looks dry, and cover with aluminum foil. Heat at approximately 350°F (175°C) until the center reaches 165°F (74°C). Uncover briefly near the end if you want to restore some of the crispy golden edges. Avoid leaving cooked stuffing at room temperature for prolonged periods.
Notes

- Origins of Sourdough Stuffing
- Health Benefits of Sourdough Stuffing
- Sourdough Stuffing Recipe: Health Benefits at a Glance
- 1. Sourdough Bread Provides Carbohydrates for Energy
- How Many Carbohydrates Does Sourdough Bread Contain?
- 2. Whole-Grain Sourdough Can Provide More Dietary Fiber
- Why Is Dietary Fiber Important?
- 3. Sourdough Fermentation Changes the Bread's Characteristics
- How to Make Sourdough Stuffing Recipe Step by Step
- Step 1: Cut the Sourdough Bread Into Even Cubes
- What Sourdough Bread Works Best?
- Step 2: Dry the Sourdough Bread Cubes
- Why Dry the Bread Before Making Stuffing?
- Can You Dry Sourdough Bread Overnight?
- Step 3: Saute the Onion and Celery in Butter
- Why Use Onion and Celery?
- Step 4: Add the Garlic and Fresh Herbs
- Can You Use Dried Herbs?
- Step 5: Prepare the Vegetable Broth and Egg Mixture
- Why Use Vegetable Broth?
- How Much Broth Is Enough?
- Step 6: Combine the Dried Bread and Buttery Vegetables
- Why Gentle Mixing Matters
- Step 7: Let the Bread Absorb the Broth
- What If You Added Too Much Broth?
- Health Benefits of Sourdough Stuffing
Origins of Sourdough Stuffing
Imagine a farmhouse kitchen on a chilly autumn morning. A loaf of bread sits on a wooden table, fresh herbs have been gathered, and onions slowly soften in a pan of melted butter. Soon, the kitchen fills with the comforting aroma of sage, thyme, and warm bread, the familiar beginning of a homemade holiday meal.
Today, we might recognize those ingredients as the foundation of a delicious Sourdough Stuffing Recipe.
But the story behind this classic side dish is far older than Thanksgiving itself.
Bread stuffing has roots in centuries of European cooking, while sourdough bread belongs to an even older tradition of natural fermentation. Both developed long before modern ovens, packaged bread cubes, or holiday casseroles existed.
Over generations, cooks discovered that bread could absorb flavorful liquids, herbs, and other ingredients, transforming even a leftover loaf into something delicious.
Eventually, bread-based stuffing became a familiar part of American holiday cooking.
And as home bakers began experimenting with different breads, sourdough offered a wonderfully rustic alternative to traditional white bread.
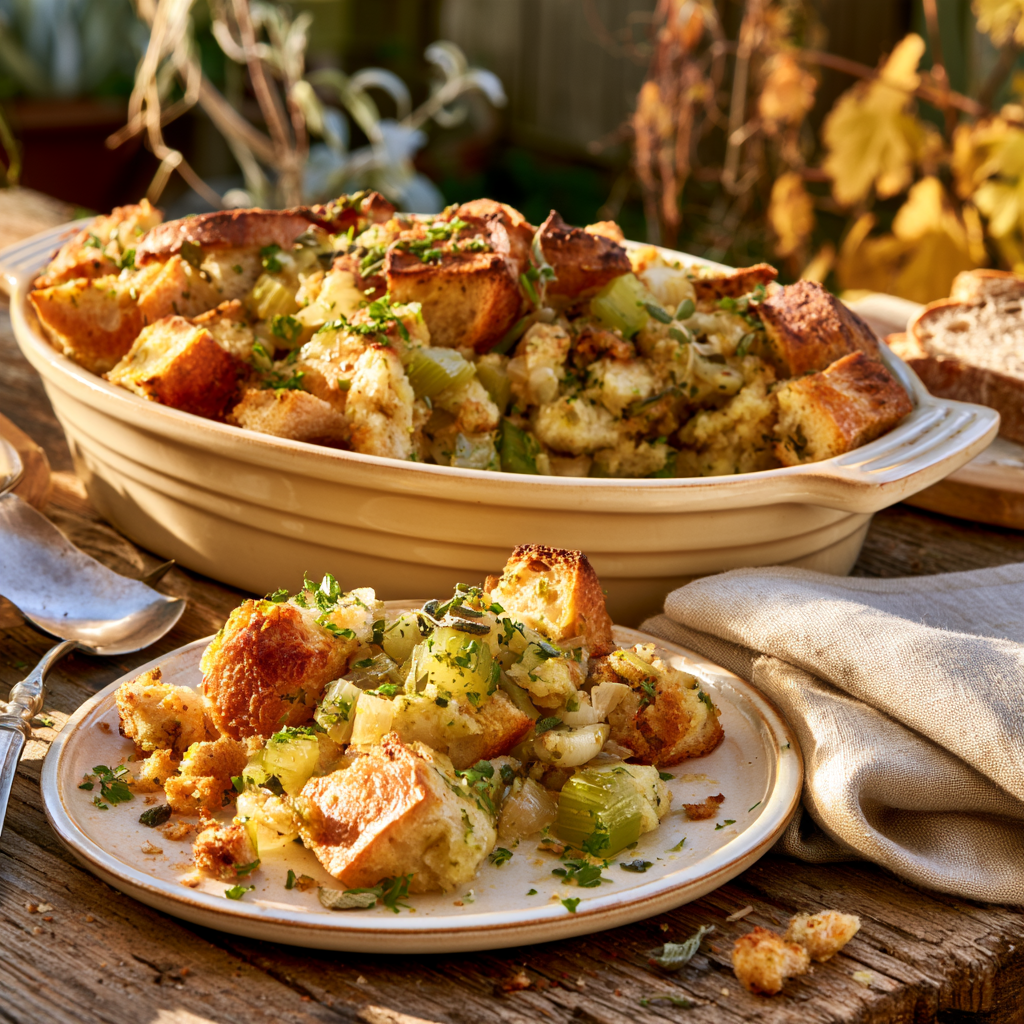
Its gently tangy flavor, sturdy texture, and beautifully crisp crust made it particularly suitable for a stuffing that is golden on top and moist underneath.

Health Benefits of Sourdough Stuffing
There’s something especially comforting about a warm spoonful of homemade sourdough stuffing. The golden, crispy edges, soft buttery center, and wonderful aroma of sage, thyme, rosemary, and garlic make it one of those dishes everyone looks forward to during Thanksgiving and Christmas.
But beyond its delicious flavor, you might be wondering: Is sourdough stuffing healthy? Is sourdough bread more nutritious than regular bread? And can homemade stuffing fit into a balanced diet?
The answer depends on the ingredients, the type of bread, and how much you serve.
Our Sourdough Stuffing Recipe begins with approximately one pound (450 g) of sourdough bread, combined with sauteed onions, celery, garlic, fresh herbs, unsalted butter, vegetable broth, and eggs.
Together, these ingredients create a satisfying holiday side dish that provides carbohydrates for energy, some protein, and a variety of vitamins and minerals.
Sourdough bread also has an interesting nutritional story. Its traditional fermentation process can change certain components of the flour, while choosing whole-grain sourdough can increase the fiber content of the finished stuffing.
However, there’s an important distinction between the nutritional qualities of sourdough bread and those of the completed casserole.
The butter contributes richness and saturated fat, while bread and broth can add a considerable amount of sodium. And although sourdough is made through fermentation, the finished baked bread isn’t a reliable source of live probiotics.
The good news is that homemade sourdough stuffing can be part of a balanced holiday meal, and a few thoughtful ingredient choices can make it more nutritious without sacrificing its buttery, savory flavor.
Let’s explore the genuine nutritional benefits of sourdough stuffing, what science says about fermented bread, and how to enjoy this classic comfort food more mindfully.
Sourdough Stuffing Recipe: Health Benefits at a Glance
| Ingredient | Main Nutritional Contribution | Role in the Recipe |
|---|---|---|
| Sourdough bread | Carbohydrates, protein, and varying amounts of B vitamins and minerals | Provides energy, texture, and the main bread base |
| Whole-grain sourdough, if used | More fiber and whole-grain nutrients than refined white bread | Can improve the fiber content |
| Unsalted butter | Fat and small amounts of fat-soluble vitamins | Creates richness and golden edges |
| Onion | Small amounts of fiber and plant compounds | Builds savory sweetness |
| Celery | Water, small amounts of fiber, and vitamin K | Adds vegetables and classic stuffing flavor |
| Garlic | Aromatic sulfur-containing compounds | Adds flavor without much extra energy |
| Sage | Concentrated herbal flavor | Provides the traditional stuffing aroma |
| Thyme and rosemary | Aromatic plant compounds | Add savory complexity |
| Fresh parsley | Small amounts of vitamin K and other nutrients | Adds freshness and color |
| Eggs | Protein, choline, and vitamin B12 | Help bind the stuffing |
| Vegetable broth | Moisture and flavor, with sodium depending on brand | Makes the bread tender and savory |
The most important point is that this dish provides energy and some useful nutrients, but it’s still a rich bread-based side dish rather than a complete meal.
1. Sourdough Bread Provides Carbohydrates for Energy
The main ingredient in this recipe is sourdough bread.
Like other wheat-based breads, sourdough contains carbohydrates, primarily in the form of starch.
During digestion, much of this starch is broken down into glucose, which the body uses as a source of energy.
Glucose is especially important for tissues such as the brain and for supporting everyday physical activity.
That doesn’t mean everyone needs a large serving of bread at every meal, but carbohydrates are a normal and useful component of many balanced eating patterns.
Sourdough stuffing offers a flavorful way to include them.
How Many Carbohydrates Does Sourdough Bread Contain?
According to USDA-derived reference values, 100 g of sourdough bread provides approximately:
- 272 calories
- 52 g carbohydrates
- 11 g protein
- 2 g dietary fiber
These figures vary depending on the flour, hydration, added ingredients, and baking method.
Our recipe uses approximately 450 g sourdough bread divided among eight servings.
That works out to about 56 g of bread per serving before adding the vegetables, broth, butter, and eggs.
The bread therefore contributes roughly 29 g of carbohydrates to each portion.
Because the recipe is a side dish, it pairs naturally with protein-rich foods and vegetables.
OoohDelish Tip: If your Thanksgiving menu already includes mashed potatoes, rolls, and other starchy sides, consider serving a smaller portion of stuffing so you can enjoy a wider variety of foods.
2. Whole-Grain Sourdough Can Provide More Dietary Fiber
One of the best ways to improve the nutritional profile of homemade sourdough stuffing is to choose a bread containing whole grains.
Not all sourdough is whole grain.
Some artisan sourdough loaves are made almost entirely with refined white flour.
Others use whole wheat, whole rye, or a mixture of whole-grain and refined flours.
This distinction matters because much of a grain’s natural fiber is found in its bran.
When grain is refined, the bran and germ are largely removed, reducing the fiber and some of the original nutrients.
Whole-grain bread retains more of these components.
Why Is Dietary Fiber Important?
Dietary fiber contributes to normal digestive function.
Different types of fiber can help support regular bowel movements, influence how quickly certain carbohydrates are digested, and contribute to feelings of fullness.
Diets containing adequate fiber are also associated with important long-term health benefits.
However, a sourdough label alone doesn’t guarantee a high-fiber product.
A loaf made with refined white flour may provide only modest amounts of fiber.
For a more fiber-rich stuffing, choose a whole-wheat sourdough or a sourdough containing a meaningful proportion of whole-grain flour.
Check the ingredients and nutrition label rather than relying on the loaf’s color.
If you enjoy baking bread at home, our Same Day Sourdough Bread Recipe is a useful starting point. You can explore incorporating some whole-wheat flour into the loaf, although this may require adjustments to the dough’s hydration and fermentation.
The takeaway: Whole-grain sourdough can increase the fiber content of stuffing, but traditional white sourdough is not automatically a high-fiber bread.
3. Sourdough Fermentation Changes the Bread’s Characteristics
One of the reasons sourdough attracts so much nutritional interest is its fermentation process.
Traditional sourdough begins with a starter containing yeasts and lactic acid bacteria.
These microorganisms interact with the flour and water during fermentation.
The process produces organic acids and influences the dough’s flavor, texture, and other properties.
It can also change some of the naturally occurring compounds in the grain.
For example, sourdough fermentation may reduce certain phytates under suitable conditions.
Phytates are compounds found in grains that can bind some minerals during digestion.
Reducing them may improve the potential availability of certain minerals.
How to Make Sourdough Stuffing Recipe Step by Step
Step 1: Cut the Sourdough Bread Into Even Cubes
Start with approximately 1 pound (450 g) of sourdough bread.
Place the loaf on a cutting board and use a serrated bread knife to cut it into pieces approximately ¾–1 inch wide.
Try to keep the pieces reasonably similar in size.
This is important because smaller cubes absorb broth and soften faster than larger ones.
If the bread is cut unevenly, some pieces may become mushy while others remain dry or chewy.
You can leave the crust on.
In fact, that’s one of the things I love about sourdough stuffing!
The crust provides extra texture and helps create beautifully crisp edges during baking.
However, if your sourdough has an extremely thick, hard crust, you can trim away some of the toughest portions.
What Sourdough Bread Works Best?
Choose a sturdy sourdough loaf with a relatively even crumb and a pleasantly tangy flavor.
A very soft loaf may break apart too easily, while an extremely dense loaf can remain chewy.
Homemade sourdough is wonderful, but a good bakery loaf works perfectly.
If you enjoy baking your own bread, our Same Day Sourdough Bread Recipe is a great starting point for preparing a homemade loaf.
OoohDelish Tip: Don’t crush the bread while cutting. Use gentle sawing motions to preserve the rustic cube shapes.
Step 2: Dry the Sourdough Bread Cubes
This step is essential for creating stuffing that’s moist without being soggy.
Preheat your oven to 250°F (120°C).
Spread the sourdough cubes across one or two large baking sheets.
Keep them in a relatively even layer rather than piling them too high.
Place the baking sheets in the oven and dry the bread for approximately 35–45 minutes, tossing the cubes once or twice during the process.
The goal is to remove moisture rather than develop a deeply golden crust.
The cubes should feel dry and firm, with very little softness remaining inside.
Once ready, remove them from the oven and allow them to cool briefly.
Why Dry the Bread Before Making Stuffing?
Fresh bread contains moisture.
If you combine soft bread directly with broth, butter, and eggs, the mixture may become overly compressed or gummy.
Dried bread cubes absorb the savory liquid more evenly while maintaining more of their structure.
That’s how you get tender bread inside and wonderfully crispy pieces on top.
Can You Dry Sourdough Bread Overnight?
Yes.
Cut the bread into cubes and spread them out in a clean, dry place overnight.
Once the cubes are fully dried, store them appropriately until you’re ready to make the stuffing.
This is particularly convenient when preparing for Thanksgiving.
OoohDelish Secret: Properly dried bread is one of the biggest differences between excellent homemade stuffing and a soggy casserole.
Step 3: Saute the Onion and Celery in Butter
Once the bread is ready, increase the oven temperature to 375°F (190°C).
Place a large skillet over medium heat.
Add ½ cup (113 g) unsalted butter and allow it to melt gently.
Once melted, add the diced yellow onion and chopped celery.
Cook for approximately 5–7 minutes, stirring occasionally.
The onion should become soft and translucent.
The celery should soften while retaining a little structure.
Avoid cooking the vegetables until deeply browned.
You want them tender and fragrant, with a mellow savory sweetness.
As they cook, the butter becomes infused with their flavor.
This buttery vegetable mixture is what gives classic stuffing its familiar holiday aroma.
Why Use Onion and Celery?
These two ingredients create the traditional flavor foundation of American-style stuffing.
Onion adds gentle sweetness.
Celery contributes a distinctive savory taste and subtle texture.
Together with butter and fresh herbs, they make the sourdough taste wonderfully rich and comforting.
OoohDelish Tip: Cut the onion and celery into small, even pieces so they distribute throughout the bread without creating large vegetable chunks.
Step 4: Add the Garlic and Fresh Herbs
Once the onion and celery are tender, add:
- 3 minced garlic cloves
- 2 tablespoons chopped fresh sage
- 1 tablespoon fresh thyme leaves
- 1 teaspoon finely chopped fresh rosemary
- ¼ cup chopped fresh parsley
Stir everything together for approximately 1–2 minutes, just until the garlic and herbs become fragrant.
Be careful not to burn the garlic.
At this point, your kitchen should smell absolutely wonderful!
The sage provides the classic holiday flavor.
Thyme adds a gentle earthy aroma.
Rosemary contributes a subtle woodsy note.
Parsley brings freshness and color.
The melted butter helps carry these flavors throughout the stuffing.
Can You Use Dried Herbs?
Yes, but dried herbs are usually more concentrated than fresh herbs.
As a starting point, replace the 2 tablespoons fresh sage with approximately 2 teaspoons dried rubbed sage and the 1 tablespoon fresh thyme with about 1 teaspoon dried thyme.
For rosemary, start with a small pinch of dried, finely crushed leaves.
Taste and adjust rather than using an equal volume of dried herbs.
OoohDelish Secret: Sage is the signature flavor of classic holiday stuffing, so don’t let the rosemary overpower it.
Turn off the heat once the herbs become fragrant.
Step 5: Prepare the Vegetable Broth and Egg Mixture
In a large mixing bowl or measuring jug, combine:
- 2¼ cups (540 ml) low-sodium vegetable broth
- 2 large eggs
- ½ teaspoon black pepper
- Up to ½ teaspoon fine salt, depending on the saltiness of your bread and broth
Whisk thoroughly until the eggs are fully blended into the broth.
The mixture should look smooth and evenly combined.
The eggs help bind the sourdough cubes during baking, creating a tender casserole that holds together without becoming overly dense.
The broth provides moisture and carries the buttery herb flavors throughout the bread.
Why Use Vegetable Broth?
Vegetable broth gives the stuffing a savory flavor without requiring chicken or turkey broth.
This keeps the recipe vegetarian when the other ingredients are suitable.
Choose low-sodium broth whenever possible.
Sourdough bread already contains salt, and you can always add more seasoning if needed.
How Much Broth Is Enough?
The exact amount depends on how dry and dense your sourdough bread is.
For 450 g of dried bread, 2¼ cups is a useful starting point.
The finished bread mixture should be thoroughly moistened but not swimming in liquid.
OoohDelish Tip: Don’t add extra salt automatically. The bread and broth may already provide enough seasoning.
Step 6: Combine the Dried Bread and Buttery Vegetables
Transfer the dried sourdough cubes into a very large mixing bowl.
Add the warm buttery onion, celery, garlic, and herb mixture.
Use a large spoon or spatula to toss everything gently.
The goal is to distribute the vegetables and herbs among the bread cubes without breaking them apart.
At this stage, the bread should look rustic and inviting.
You’ll see golden sourdough cubes mixed with softened onion, small green pieces of celery, and fresh herbs.
The butter will begin coating the bread, creating a wonderful foundation for the broth.
Next, slowly pour the prepared egg-and-broth mixture over the bread.
Don’t pour everything into one spot.
Move around the bowl so the liquid reaches different areas.
Gently lift and fold the cubes to distribute the moisture.
Why Gentle Mixing Matters
Sourdough bread can hold its shape well, but excessive stirring may still break the pieces apart.
You want recognizable cubes rather than a smooth bread paste.
OoohDelish Secret: Fold the mixture from the bottom of the bowl upward, just as you would with a delicate salad, to preserve the texture.
Step 7: Let the Bread Absorb the Broth
Once the bread, vegetables, and broth are combined, allow the mixture to rest for approximately 5–10 minutes.
This gives the dried sourdough time to absorb the flavorful liquid.
After resting, gently toss once more and check the texture.
The bread should feel moist but not completely saturated.
There shouldn’t be a large puddle of liquid collecting at the bottom of the bowl.
How to Tell If the Stuffing Has Enough Moisture
Pick up a bread cube or gently press a small portion with a spoon.
It should feel tender and moistened, not hard and dry.
Some cubes may remain slightly firmer because of their crusts, which is perfectly normal.
If the bread seems unusually dry, add another small splash of warm vegetable broth.
If the mixture looks excessively wet, let it rest a little longer so the cubes can absorb more liquid.
Avoid adding large amounts of broth without checking.
If the mixture has become overly wet, gently fold in a small amount of additional dried bread cubes if available.
Remember that the stuffing will continue changing texture during baking.

What If You Added Too Much Broth?
Don’t try to fix the problem by vigorously stirring, since that can make the texture even more compressed.
OoohDelish Tip: Moist stuffing is delicious, but soggy stuffing isn’t. Let the bread absorb the liquid before making your final adjustment.
Step 8: Transfer the Stuffing to a Baking Dish
Lightly grease a 9 × 13-inch (23 × 33 cm) baking dish with a suitable cooking spray or a little additional butter.
Transfer the prepared sourdough mixture into the dish.
Spread it evenly using a spoon or spatula.
Avoid pressing the stuffing down too firmly.
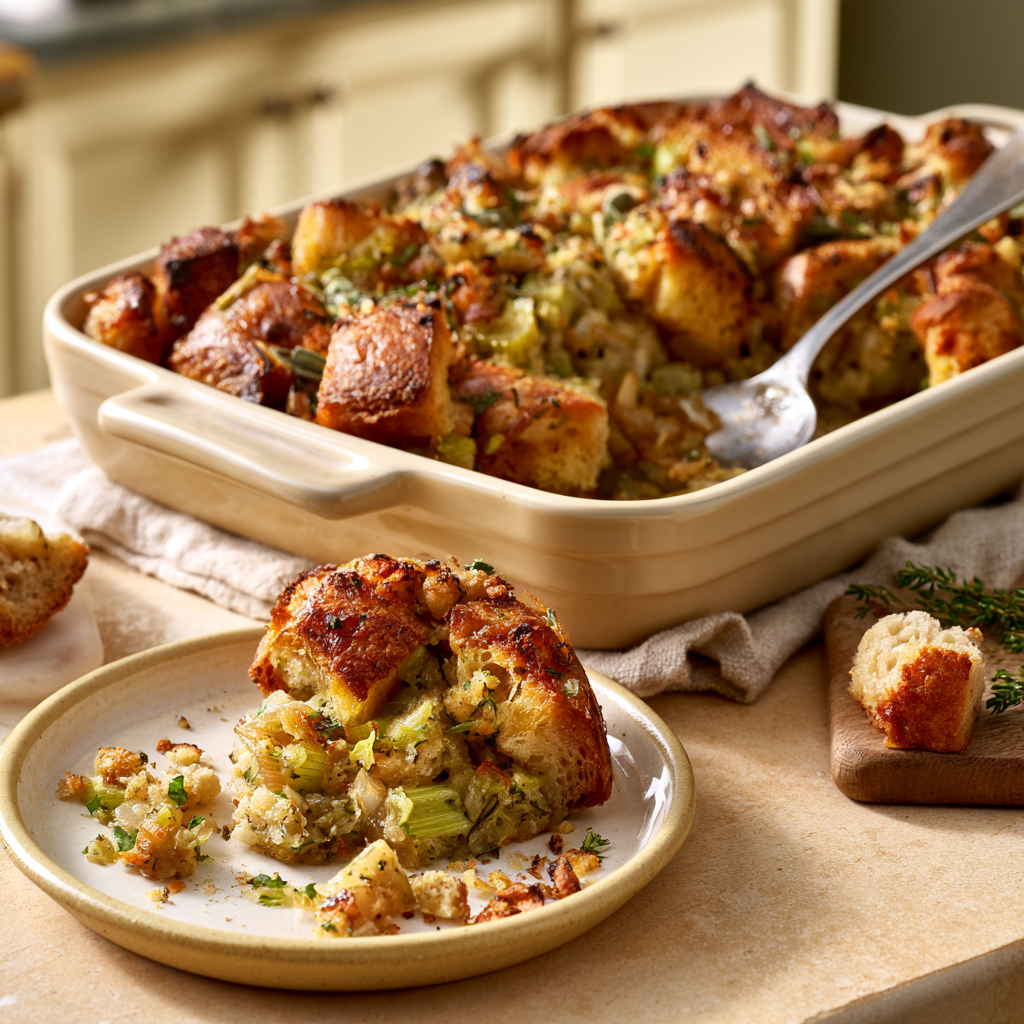
You want it to remain slightly loose so the pieces retain their shape and the top can develop golden, crispy edges.
Gently arrange a few bread cubes near the surface.
This creates the rustic appearance that makes homemade sourdough stuffing so appealing.
The casserole should now contain visible pieces of bread, softened vegetables, and fresh herbs.
Should You Pack the Stuffing Tightly?
No.
Compressing the bread can create a dense texture.
Instead, distribute the mixture evenly and allow it to settle naturally.
A slightly uneven surface also encourages more crispy edges during baking.
OoohDelish Secret: Those little pieces of sourdough sticking up from the top often become the most deliciously golden bites!
Step 9: Bake the Sourdough Stuffing Covered
Cover the baking dish securely with aluminum foil.
Place it in the oven, preheated to 375°F (190°C).
Bake for approximately 25 minutes.
During this first stage, the foil helps retain moisture and allows the stuffing to heat more evenly.
The bread becomes tender as the broth and butter warm throughout the casserole.
The eggs also begin setting, helping bind the mixture.
Avoid removing the foil repeatedly because that allows moisture and heat to escape.
Why Cover the Stuffing First?
If you bake sourdough stuffing uncovered for the entire cooking time, the upper layer may dry out before the center has heated sufficiently.
Covering it initially helps preserve the tender texture underneath.
This is particularly useful when preparing a casserole with relatively large sourdough cubes.
The next baking stage will take care of the crispy top.
Step 10: Uncover and Bake Until Golden and Crispy
After 25 minutes, carefully remove the aluminum foil.
Return the baking dish to the oven.
Continue baking for approximately 20–25 additional minutes, or until the surface becomes golden brown and the edges develop a lightly crispy texture.
The total baking time will generally be 45–50 minutes, although the exact timing depends on your oven, baking dish, and moisture level.
How to Know When Sourdough Stuffing Is Done
The finished stuffing should have:
- A golden-brown surface
- Slightly crispy bread edges
- A moist but set center
- Tender onion and celery
- A fragrant buttery-herb aroma
- No visible pockets of uncooked egg mixture
Because the recipe contains eggs, use a food thermometer and aim for 165°F (74°C) in the center.
If the top is browning too quickly before the center reaches the target temperature, loosely cover the dish with foil and continue baking.
How to Make Extra-Crispy Stuffing
For more golden edges, allow the stuffing to bake uncovered toward the end until it reaches your preferred color.
Avoid excessively extending the baking time, as this can dry out the center.
OoohDelish Secret: The perfect sourdough stuffing has contrast: golden and slightly crunchy on top, tender and buttery underneath.
Step 11: Let the Sourdough Stuffing Rest and Serve
Once the stuffing is beautifully golden and fully cooked, carefully remove it from the oven.
Place the dish on a heat-safe surface.
Allow it to rest for approximately 5–10 minutes before serving.
This brief resting period helps the casserole settle and makes it easier to spoon onto plates.
If desired, sprinkle a little extra freshly chopped parsley over the surface.
The bright green parsley looks beautiful against the golden bread.
Serve the stuffing warm.
Frequently Asked Questions About Sourdough Stuffing Recipe
Want homemade sourdough stuffing with perfectly golden, crispy edges, a moist, tender center, and the comforting flavors of sage, thyme, butter, onions, and celery? These practical answers explain how to prepare sourdough bread, balance the broth, prevent soggy stuffing, develop delicious holiday flavors, and prepare everything safely. Discover how to make this comforting Thanksgiving side dish a delicious addition to your holiday table.
1. What is sourdough stuffing, and what does it taste like?
Sourdough stuffing is a savory bread-based side dish made with dried sourdough cubes, sautéed vegetables, herbs, butter, and broth. The bread absorbs the flavorful liquid while retaining some of its hearty texture. When baked in a casserole dish, the top becomes golden and slightly crispy while the interior stays moist. Sourdough contributes a gentle tangy flavor that balances the richness of the butter and the earthy notes of sage and thyme. It’s particularly popular for Thanksgiving and Christmas dinners.
2. What is the difference between sourdough stuffing and traditional stuffing?
The main difference is the bread. Traditional stuffing often uses white sandwich bread, French bread, or country-style bread, while sourdough stuffing uses bread made through sourdough fermentation. Sourdough generally provides a tangier flavor, a sturdier crust, and a pleasantly chewy texture. Both versions can include onions, celery, sage, thyme, and savory broth. For a more traditional variation made with country bread and classic holiday herbs, explore our Turkey Stuffing Recipe .
3. What type of sourdough bread is best for stuffing?
A sturdy, rustic sourdough loaf with a firm crust and substantial crumb is an excellent choice. Country-style sourdough holds its shape well when moistened with broth, helping create distinct, tender pieces rather than a paste. Plain sourdough is ideal because its flavor complements traditional stuffing seasonings. You can use homemade or bakery-bought bread, provided it’s fresh enough to be safe and free from spoilage. For another homemade sourdough bread idea, explore our Sourdough Focaccia Recipe .
4. Should sourdough bread be fresh, stale, or toasted before making stuffing?
Dried sourdough bread usually produces the best stuffing texture. Fresh bread often contains too much moisture and can turn soft or gummy after adding broth. Stale bread may work, but it should still feel dry enough to absorb liquid evenly. For consistent results, cut the bread into cubes and dry them gently in the oven before mixing. The goal is removing excess moisture, not burning the crust. Never use moldy or spoiled bread, even if it will be baked.
5. How do you dry sourdough bread cubes for stuffing?
Cut sourdough bread into approximately 3/4- to 1-inch cubes and arrange them in a single layer on baking sheets. Dry the cubes in a low oven, often around 275°F (135°C), turning them occasionally until their surfaces feel dry and firm. Depending on the bread and cube size, this may take roughly 20–30 minutes. Avoid deeply browning every piece, since the stuffing will bake again. Allow the dried bread to cool before combining it with the seasoned vegetables and broth.
6. What ingredients are needed for homemade sourdough stuffing?
A classic sourdough stuffing recipe generally includes dried sourdough bread cubes, onions, celery, butter, garlic, sage, thyme, parsley, and broth. Salt and black pepper help balance the savory flavors. Some versions include rosemary, eggs, mushrooms, apples, or dried cranberries. The vegetables are usually sautéed until tender before being mixed with the dried bread. Warm broth is then added gradually to moisten the mixture. For a pork-free version, there’s no need to include bacon or sausage.
7. How much broth should you add to sourdough stuffing?
Add broth gradually rather than pouring it in all at once. The amount needed depends on the bread’s density, how thoroughly the cubes were dried, and the quantity of vegetables and butter used. Begin with the amount specified in your recipe, fold gently, and let the bread absorb the liquid before adding more. The cubes should feel evenly moist and flexible without sitting in a pool of broth. Sourdough varies between bakeries, so observing the texture is especially important.
8. Do you need eggs to make sourdough stuffing?
No, eggs aren’t essential in every sourdough stuffing recipe. Some versions use beaten eggs to bind the bread into a firmer, more cohesive casserole. Others rely on broth, butter, and the starch in the bread for a softer, more rustic texture. If your recipe doesn’t include eggs, there’s usually no reason to add them. If it does, avoid removing them without considering how the change affects the structure. Regardless of the ingredients, cook the stuffing thoroughly.
9. Can sourdough stuffing be vegetarian, vegan, or made without sausage?
Absolutely! Sourdough stuffing can be delicious without any meat or sausage. For a vegetarian version, use vegetable broth instead of chicken or turkey broth and choose suitable seasonings. For a vegan version, replace dairy butter with olive oil or plant-based butter, omit eggs if necessary, and verify that the sourdough bread contains no animal-derived ingredients. Sautéed mushrooms can add satisfying savory depth. Fresh herbs and properly dried bread provide plenty of flavor without pork ingredients.
10. Which herbs taste best in sourdough stuffing?
Sage and thyme are two of the best herbs for traditional sourdough stuffing. Sage contributes a warm, savory holiday flavor, while thyme adds gentle earthy notes. Rosemary provides a more pronounced aromatic flavor, and fresh parsley brings brightness. You can use fresh or dried herbs, but dried varieties are generally more concentrated. Adjust their amounts accordingly. For additional depth, cook the herbs briefly with softened onions, celery, and butter before combining everything with the bread.
11. Why is my sourdough stuffing soggy, mushy, or gummy?
Soggy stuffing often results from too much broth, insufficiently dried bread, or excessive mixing. Fresh sourdough can absorb liquid unevenly and collapse into a dense texture if the cubes aren’t properly dried. To prevent this, dry the bread thoroughly, add broth in stages, and fold gently to preserve individual pieces. Avoid pressing the mixture tightly into the baking dish. If the surface is still very wet, bake uncovered as directed until excess moisture evaporates and the center cooks through.
12. Why is my sourdough stuffing dry, crumbly, or hard on top?
Dry stuffing usually needs more moisture or better protection during baking. Very crusty sourdough can require additional broth compared with softer sandwich bread. If the mixture looks dry before baking, add a little warm broth and fold gently. Covering the dish during the first part of baking helps retain moisture, while uncovering it later develops golden edges. If the top becomes too dark before the center is cooked, cover loosely with foil and continue baking until done.
13. What temperature and how long should you bake sourdough stuffing?
Many casserole-style sourdough stuffing recipes bake at approximately 350°F (175°C), although exact temperatures and times vary with the ingredients and baking dish. Some recipes require approximately 35–50 minutes or longer. Covering the dish initially can preserve moisture, while uncovering it toward the end encourages crisp golden edges. Follow your recipe card rather than relying only on a general time range. For safe doneness, check that the stuffing’s center reaches 165°F (74°C).
14. Is it better to bake sourdough stuffing separately or inside a turkey?
Baking sourdough stuffing separately in a casserole dish is the safer and more convenient option. It makes temperature checks easier and provides more exposed surface for golden, crispy bread edges. When stuffing is cooked inside a turkey, the center may heat more slowly than the surrounding meat. The USDA recommends checking that the center of stuffing reaches at least 165°F (74°C) whether it’s baked separately or inside poultry. If stuffing a turkey, assemble and fill it immediately before cooking.
15. Can I make sourdough stuffing ahead of time for Thanksgiving?
Yes, but the best make-ahead method is to prepare the components separately. Cube and dry the sourdough bread ahead of time, chop the onions and celery, and measure the herbs. Keep perishable ingredients refrigerated and combine the dry and wet ingredients immediately before baking. Don’t refrigerate fully assembled, uncooked stuffing to bake the next day. Alternatively, bake the stuffing completely, refrigerate it promptly, and reheat it to 165°F (74°C) before serving.
16. How do you store, freeze, and reheat sourdough stuffing, and what should you serve with it?
Refrigerate cooked sourdough stuffing within two hours in shallow, airtight containers at 40°F (4°C) or below. Use refrigerated leftovers within 3–4 days, or freeze for approximately 2–3 months for best quality. Reheat thoroughly to 165°F (74°C), adding a splash of broth if needed to restore moisture. Serve with roasted turkey, chicken, mashed potatoes, cranberry sauce, or Parmesan Roasted Broccoli for a delicious and colorful holiday meal.